Landscape travel photography is one of the most beautiful parts of travel. When you visit a new place, the first thing that often catches your eye is the view. It may be a mountain, beach, lake, forest, desert, waterfall, road, or city skyline. These scenes make travel feel special.
A good landscape photo can save the beauty of a place forever. It can remind you of fresh air, open roads, peaceful mornings, golden sunsets, and amazing views. But many beginners feel disappointed when their landscape photos do not look the same as the real place. The view may look beautiful in person, but the photo may look flat, dull, or empty.
This happens because landscape photography needs more than just pointing the camera at a nice view. You need to understand light, composition, timing, depth, and focus. The good news is that you do not need expensive gear to take better landscape travel photos. You can use a phone or a camera and still capture stunning outdoor scenes.
In this guide, you will learn simple landscape travel photography tips. These tips are easy to follow and useful for beginners. You will learn how to capture mountains, beaches, roads, forests, sunsets, lakes, and other natural views in a better way.
What Is Landscape Travel Photography?
Landscape travel photography means taking photos of outdoor places during your trip. It focuses on natural views and wide scenes. These photos may include mountains, rivers, beaches, deserts, forests, waterfalls, valleys, roads, fields, and skies.
It can also include city landscapes. For example, a skyline, bridge, old town view, or rooftop city scene can also be part of landscape travel photography.
The goal is to show the beauty, mood, and scale of a place. A strong landscape photo makes the viewer feel like they are standing there with you.
Landscape photography is not only about the location. It is also about the way you capture the scene. Light, angle, weather, and timing can completely change the final photo.
Why Landscape Photography Is Important in Travel
Landscape photos are often the main memory of a trip. When people think about a destination, they usually remember the views first.
A beach trip may be remembered through a sunset photo. A mountain trip may be remembered through a wide valley shot. A road trip may be remembered through a long empty road. A city trip may be remembered through a skyline view.
Landscape photography also helps tell the story of a destination. It shows where you went, what the place looked like, and how it felt.
For travel bloggers, landscape photos are very important. They work well as featured images, website banners, social media posts, Pinterest pins, and guide images. A strong landscape photo can make people want to read your article or visit the place.
Use the Best Light
Light is the most important part of landscape travel photography. The same location can look very different at different times of the day.
Morning and evening light usually gives the best results. The light is soft, warm, and gentle. It creates beautiful colors and smooth shadows.
The time shortly after sunrise is great for peaceful landscape photos. Places are often less crowded, and the light looks fresh. The time before sunset is also excellent because the sky becomes warm and colorful.
Midday light can be harsh. It can make photos look too bright and flat. Shadows may become strong, and the sky may look washed out. If you are taking photos during the day, try to use clouds, shade, or interesting foreground elements to improve the image.
Good light can turn a simple view into a powerful photo.
Shoot During Golden Hour
Golden hour is one of the best times for landscape photography. It happens shortly after sunrise and shortly before sunset.
During golden hour, the sunlight is softer and warmer. It gives mountains, beaches, fields, roads, and buildings a beautiful glow.
This light can make colors look richer. It can also add depth to your photos because shadows are softer and longer.
For example, a mountain view during midday may look normal. But the same mountain during golden hour may look dramatic and magical.
If you want better landscape travel photos, try to plan your shoot around golden hour. Wake up early or stay out until sunset. The results are often worth the effort.
Do Not Ignore Blue Hour
Blue hour is the short time before sunrise and after sunset. The sky becomes deep blue, and the light looks calm and soft.
This is a great time for cityscapes, beaches, lakes, and mountain scenes. Blue hour gives photos a peaceful and dreamy feeling.
If you are in a city, blue hour can look amazing because building lights and street lights start to glow while the sky is still visible.
For nature scenes, blue hour can create a calm mood. A lake, beach, or mountain can look very peaceful during this time.
Many beginners stop taking photos as soon as the sun goes down. But staying a little longer can help you capture beautiful blue hour shots.
Find a Strong Foreground
A landscape photo can look empty if there is nothing interesting in the front.
Foreground means the part of the scene closest to the camera. A strong foreground adds depth and makes the viewer feel like they are inside the photo.
Good foreground elements include rocks, flowers, grass, footprints, water, a path, a fence, a boat, shells, or a person standing in the scene.
For example, if you are taking a beach photo, include waves, rocks, or footprints in the foreground. If you are taking a mountain photo, include flowers, grass, or a walking path.
A good foreground makes your landscape photo more interesting and complete.
Use Leading Lines
Leading lines are lines that guide the viewer’s eyes into the photo. They make your image feel deeper and more professional.
You can find leading lines in roads, rivers, bridges, paths, fences, railway tracks, shorelines, and rows of trees.
For landscape travel photography, leading lines are very helpful. A road can lead the eye toward mountains. A river can guide the viewer into a valley. A path can pull the viewer toward a forest or viewpoint.
When you see a beautiful view, look for natural lines around you. Place them in the frame so they guide attention toward the main subject.
This simple technique can improve your photos quickly.
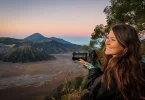
Add a Human Element
Many landscape photos look better when there is a person in the frame. A person adds scale and emotion.
For example, a mountain may look large in real life, but in a photo, it may look smaller. If you add a person standing near the mountain, the viewer can understand its size better.
A person can also make the photo feel more personal. Someone walking on a road, standing near a lake, sitting on a rock, or looking at the sunset can create a strong travel mood.
The person does not need to face the camera. In many landscape photos, a back-facing pose works well. It keeps the focus on the view while adding emotion.
Keep the Horizon Straight
A crooked horizon can make a landscape photo look careless. This is very common in beach, lake, desert, and city skyline photos.
Before taking the photo, check if the horizon is straight. Use your phone or camera grid lines to help.
If you already took the photo and it looks tilted, fix it during editing. Most phone editing tools have a straighten option.
A straight horizon makes the photo feel cleaner and more balanced.
Use the Rule of Thirds
The rule of thirds is very useful in landscape travel photography.
Turn on grid lines on your phone or camera. You will see the screen divided into nine parts.
Instead of placing the horizon in the exact middle, try placing it near the top third or bottom third.
If the sky is very beautiful, give it more space. Place the horizon lower. If the land, road, beach, or water is more interesting, give it more space and place the horizon higher.
This makes the photo look more natural and balanced.
Capture Reflections
Reflections can make landscape photos look amazing. You can find reflections in lakes, rivers, puddles, wet roads, glass, and calm sea water.
Mountain reflections in a lake are classic and beautiful. City lights reflected on water can also look stunning.
For the best reflection photos, try shooting when the water is calm. Early morning is often a good time because there is less wind.
Place the reflection carefully in the frame. Sometimes a centered composition works well for reflection photos because it creates symmetry.
Reflections add depth, beauty, and creativity to landscape travel photography.
Include the Sky
The sky can change the mood of a landscape photo. A clear blue sky feels peaceful. A cloudy sky feels dramatic. A sunset sky feels warm. A stormy sky feels powerful.
Before taking a photo, look at the sky. If it is interesting, include more of it. If the sky is plain and empty, include less of it and focus more on the land, water, or foreground.
Clouds can make a landscape photo much better. They add texture and movement.
Sunrise and sunset skies are especially useful because they add color and emotion to your images.
Use Weather Creatively
Weather can make landscape travel photography more interesting.
Many beginners only want sunny weather. But clouds, rain, fog, snow, and wind can create beautiful photos.
Fog can make forests and mountains look mysterious. Rain can create reflections. Snow can make landscapes look peaceful. Wind can add movement to grass, trees, clothes, and water.
Cloudy weather is also great for soft and even light. It can help avoid harsh shadows.
Do not stop taking photos just because the weather is not perfect. Sometimes bad weather creates the most memorable travel photos.
Shoot From Different Heights
Changing your height can change the whole photo.
If you take every landscape photo while standing normally, your images may look similar. Try shooting from low, high, and normal angles.
A low angle can make rocks, flowers, grass, or paths look stronger in the foreground. A high angle can show patterns, roads, beaches, valleys, and city layouts more clearly.
If you are near a hill, bridge, balcony, viewpoint, or rooftop, use it. A higher view can give you a wider and more impressive landscape photo.
Always look for new viewpoints when traveling.
Use Natural Frames
A natural frame means using something in the scene to frame your main view.
You can use tree branches, windows, doors, caves, arches, rocks, bridges, or building openings.
For example, you can photograph a mountain through a window. You can capture a beach view between two palm trees. You can frame a city skyline through an arch.
Natural frames make photos look more creative. They also help guide the viewer’s eye toward the main scene.
This technique is simple and works well for both phone and camera users.
Take Wide Photos
Landscape photography often needs wide photos because the goal is to show the full scene.
Use the wide lens on your phone if available. If you use a camera, a wide-angle lens can help capture more of the view.
Wide photos are great for mountains, beaches, forests, deserts, city skylines, and lakes.
But be careful. Wide photos can sometimes make the main subject look too small. To avoid this, include a strong foreground or a clear subject in the frame.
A wide photo should still have structure. Do not just capture everything randomly.
Capture Small Details Too
Landscape photography is not only about wide views. Small details can make your travel photo story richer.
Take photos of leaves, rocks, sand patterns, flowers, tree bark, shells, water drops, snow texture, and footprints.
These details show the character of the place. They also help your blog or album feel more complete.
For example, if you visit a beach, do not only photograph the ocean. Capture shells, waves, sand marks, beach grass, and footprints too.
Detail photos work well between wide landscape shots.
Use a Tripod When Possible
A tripod helps keep your camera or phone steady. This is useful for low light, sunrise, sunset, night scenes, and long exposure photos.
You do not need a large tripod. A small travel tripod can be enough for beginners.
A tripod is also helpful if you travel alone and want to include yourself in the landscape. You can set a timer and stand in the frame.
If you do not have a tripod, place your phone or camera on a stable surface like a rock, wall, bench, or bag. Make sure it is safe and balanced.
Steady photos look sharper and cleaner.
Protect Your Gear Outdoors
Landscape travel photography often happens outdoors, so you need to protect your phone or camera.
Dust, rain, sand, snow, and moisture can damage gear. Keep a small cloth with you. Use a bag or cover when needed.
If you are near the beach, be careful with sand and salt water. If you are in the mountains, protect your gear from cold and moisture.
For phone users, a waterproof pouch can be helpful during beach trips, boat rides, or rainy weather.
Taking care of your gear helps you avoid problems during your trip.
Capture Roads and Paths
Roads and paths are powerful subjects in landscape travel photography. They create a feeling of journey and adventure.
A long road through mountains, a forest path, a beach walkway, or a desert road can make a beautiful photo.
Roads also work as leading lines. They guide the viewer into the image.
For a stronger photo, place a person, car, bike, or backpack somewhere in the scene. This adds scale and story.
Road photos are perfect for travel blogs because they show movement and exploration.
Photograph Water Carefully

Water is one of the best elements in landscape photography. It can be calm, powerful, reflective, or dramatic.
You can photograph oceans, lakes, rivers, waterfalls, streams, and rain puddles.
For calm water, try shooting early in the morning. For waterfalls, use a steady camera. If you know camera settings, a slow shutter speed can make water look smooth.
For beach photos, watch the waves. Take the photo when the wave creates a nice shape in the foreground.
Water adds life and movement to landscape photos.
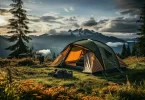
Capture Mountains Better
Mountain photography can be difficult because mountains may look smaller in photos than they do in real life.
To make mountain photos stronger, include a foreground element. This could be a path, flowers, rocks, a person, or a cabin.
Use layers if possible. Layers mean showing the foreground, middle ground, and background. This gives the image depth.
Morning and evening light can make mountains look more dramatic because shadows show their shape.
If the sky is interesting, include it. If the sky is plain, focus more on the land and mountain shapes.
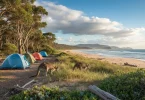
Capture Beach Landscapes
Beach photography is popular, but it can easily look too simple if you only photograph water and sky.
To make beach photos better, include elements like waves, rocks, boats, palm trees, footprints, shells, beach chairs, or people walking.
Sunrise and sunset are great times for beach photography. The light creates warm colors and beautiful reflections on wet sand.
Keep the horizon straight. This is very important for beach photos.
Try both wide shots and close-up details. Beach textures, water lines, and sand patterns can look beautiful.
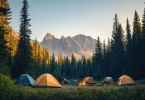
Capture Forest Landscapes
Forest photography can be magical but also challenging because light can be uneven.
Look for soft light coming through trees. Morning light often works well in forests. Fog can make forest photos look dreamy.
Use paths, tree lines, or light rays as leading lines. Add a person walking through the forest to show scale.
Forest photos look better when they have depth. Include foreground leaves, trees in the middle, and background light.
Be patient and move slowly. Small changes in position can make a forest photo much better.
Capture Desert Landscapes
Deserts are great for minimal and dramatic landscape photography.
Look for sand dunes, patterns, shadows, rocks, dry plants, footprints, and wide open space.
Morning and evening are best because the light creates beautiful shadows on the sand.
Avoid midday when the light is too harsh and the heat may be difficult.
A person walking on a dune can add scale and story. Desert photos often look powerful when they are simple and clean.
Capture City Landscapes
Landscape travel photography can also include city views.
City landscapes include skylines, bridges, rooftops, streets, towers, old towns, and night views.
For cityscapes, try shooting from rooftops, bridges, viewpoints, or hotel balconies.
Blue hour is excellent for city photos because the sky is still visible while city lights are glowing.
Use roads, bridges, and building lines to create strong composition. Reflections from water or glass can also improve city landscape photos.
Edit Landscape Photos Naturally
Editing can make landscape photos look better, but it should not make them look fake.
Start with simple edits:
brightness
contrast
shadows
highlights
sharpness
warmth
saturation
Do not make the sky too blue or the grass too green. Keep the photo close to what the place really looked like.
A natural edit looks more trustworthy and professional.
For travel blogs, natural-looking photos are better because they help readers understand the real destination.
Common Landscape Photography Mistakes
Many beginners make simple mistakes in landscape photography.
One mistake is taking photos in harsh light without thinking about shadows. Another is not having a clear subject. Some photos look empty because they have no foreground or point of interest.
Another common mistake is a crooked horizon. This is easy to fix, but it can make a big difference.
Some beginners over-edit landscape photos and make them look unnatural.
Avoid these mistakes by slowing down, checking your frame, using good light, and editing lightly.
Simple Landscape Photography Checklist
Before taking a landscape photo, ask yourself:
Is the light good?
Is the horizon straight?
Is there a clear subject?
Is there a strong foreground?
Can I use leading lines?
Is the sky interesting?
Should I include a person for scale?
Can I try a lower or higher angle?
Should I take both wide and detail shots?
This checklist can help you improve your photos quickly.
Best Places for Landscape Travel Photography
You can practice landscape travel photography almost anywhere. You do not need to visit famous places only.
Good places include:
mountains
beaches
lakes
rivers
forests
parks
deserts
roads
bridges
viewpoints
rooftops
old towns
fields
waterfalls
city skylines
Even a simple road or local park can become a good photo if the light and composition are right.
Landscape Photography for Phone Users
Phone cameras are very useful for landscape travel photography.
Use wide mode for big views. Turn on grid lines to keep the horizon straight. Tap the screen to focus. Lower exposure if the sky looks too bright.
Avoid using too much digital zoom. Move closer if possible or take a wider photo and crop later.
Use HDR mode when the scene has bright sky and dark land. This can help balance the light.
Phone photography is perfect for beginners because it is simple, fast, and easy to carry.
Landscape Photography for Camera Users
If you use a camera, start simple.
Use a wide lens for big views. Keep your camera steady. Use a lower ISO for cleaner images in good light. Try a smaller aperture, like f/8 or f/11, if you want more of the scene in focus.
Use a tripod for sunrise, sunset, and low-light scenes.
Do not worry too much about advanced settings at first. Focus on light, composition, and timing. Settings become easier with practice.
FAQs About Landscape Travel Photography
1. What is landscape travel photography?
Landscape travel photography is taking photos of outdoor views during travel. It includes mountains, beaches, lakes, forests, roads, deserts, waterfalls, and city views.
2. Can I take landscape photos with a phone?
Yes, you can take beautiful landscape photos with a phone. Use good light, keep the horizon straight, turn on grid lines, and avoid too much zoom.
3. What is the best time for landscape photography?
Morning and evening are usually best. Golden hour gives soft and warm light, while blue hour gives a calm and peaceful mood.
4. How can I make my landscape photos look better?
Use a strong foreground, keep the horizon straight, use leading lines, include a clear subject, and shoot in good light.
5. Should I include people in landscape photos?
Yes, adding a person can make the photo more interesting. It also helps show the size of mountains, beaches, forests, and other large scenes.
6. Why do my landscape photos look flat?
They may look flat because of poor light, no clear subject, no foreground, or weak composition. Try shooting during golden hour and add depth with foreground elements.
7. Do I need a tripod for landscape photography?
A tripod is helpful but not always required. It is useful for low light, sunrise, sunset, night photos, and solo travel shots.
8. How should I edit landscape photos?
Edit lightly. Adjust brightness, contrast, shadows, highlights, sharpness, and warmth. Keep colors natural and avoid over-editing.
Conclusion
Landscape travel photography is a beautiful way to capture the places you visit. It helps you save the views, moods, and memories of your journey.
You do not need expensive gear to start. A phone or basic camera can work well if you understand light, composition, and timing.
Use golden hour, keep the horizon straight, add a strong foreground, use leading lines, and try different angles. Include people when you want to show scale and emotion. Capture wide views, but do not forget small details.
Most importantly, slow down and enjoy the place. The best landscape photos often come when you take time to notice the light, shapes, weather, and feeling of the scene.
On your next trip, look beyond the simple view. Search for lines, reflections, foregrounds, skies, and natural frames. With practice, your landscape travel photos will become more powerful, beautiful, and memorable.